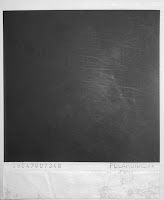
For the very beginning of our video, we had planned quite a complicated edit. The concept of the beginning scenes was to show the closeness of our two main characters' relationship, and we had filmed it in preparation for a montage. However, as this part of the narrative was particularly key for making our video make sense, we wanted to highlight it even further. We decided to do this by presenting the scenes as moving photographs, with the video playing inside a picture frame.
 The first thing we had to do to do this was find a suitable frame. We chose a Polaroid photo as the frame as we felt this was the best way we could show the moving photo concept, as normal photographs do not generally have borders. As we could not just add a frame onto the clip on Final Cut Express, we decided to download a picture and layer the two items.
We did this by placing the Polaroid image on one track, and the moving image clip on the track above it. This meant that when you viewed the project, the clip would be ordered in front of the frame, which was idea. These were both placed above a photo of a wooden table top, which would serve as our background. When the clip was covered by another Polaroid, it would eventually finish and the previous Polaroid would be blank: we didn't want this, so we also decided to repeat the clip just to give off the impression it was still playing in the background.
We then needed to crop and rotate the clip in order to make it fit the Polaroid. We did this by double clicking the clip, and going into the 'Motion' tab which gave us the option to crop. Although we could also rotate from there, we preferred doing it by enabling the 'Image+Wireframe' setting and using the options on the wireframe to rotate it.
We had to do this several times: once for each clip, and then for each Polaroid as well. As we wanted to give off the impression that they were stacking up, this meant we had to layer each new Polaroid and relating clip on top of the existing ones. In the end we ended up with 31 tracks, and 15 Polaroids.


No comments:
Post a Comment